Image Sensor:16 MP Sony Exmor R BSI CMOS
Exmor R is a back-illuminated (BackSide Illuminated) version of Sony’s CMOS image sensor. Sony claims that Exmor R is approximately twice as sensitive as a normal front illuminated sensor. Framerate & Resolution:
2K max. 30fps
1080p max. 60fps
720p max. 120 fps Lens:Aspheric surface FHD photology glass lens, F2.8 DFOV 1550 Focal length:2.73 +-5%мм; 155° wide angle Image Processor:Ambarella A7LS Connectivity:built in Wifi and Bluetooth 4.0
microUSB & microHDMI port Recording Format:Format: .mp4; Codec: .h264;
30fps recording is 29.97fps (same as GoPro)
Currently the bit rate is 25MB/s, but there is an unofficial firmware pushing the camera to 30MB/s. Audio recording:dual track, 96KHz sampling Battery:1010 mAH Standard consumption of energy:
2 w Storage:max. 64GB microSD card, class 10 recommended. Remote Control:via Android or iOS App, Bluetooth remote available
(Android 4.1 or higher, iOS 7 or higher) Output:USB 2.0 (A/V video); HDMI 1.4 (HD video) Price:
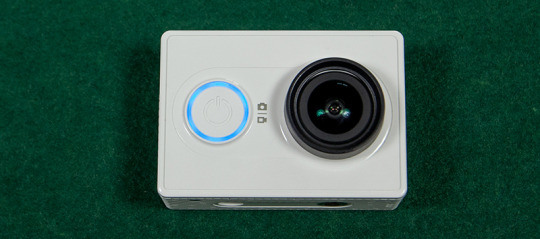
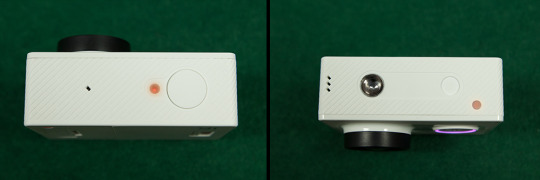
The power button is on the front of the camera. Around this button there is a LED light indicating the battery status.
With firmware 1.0.12. the power button got a new feature: It flashes when taking a photo or flashes constantly while recording a video. When doing self-timed photos it will flash until taking the picture. It can be turned off in the App.
Blue = 100-50% battery, purple: 50-15% and red: 15-0% battery.
This button is also used to switch between photo and video mode. The current mode is indicated by 3 status LED lights:
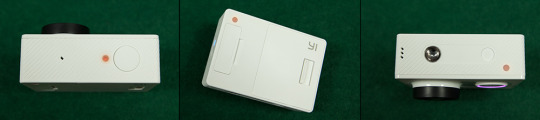
They are located on the top, backside and bottom of the camera.
When you take a photo, they flash once (a little delayed).
If you switch to video mode the will light up and while recording they are flashing.
Here my first point of criticism: They are not very bright and hard to see.
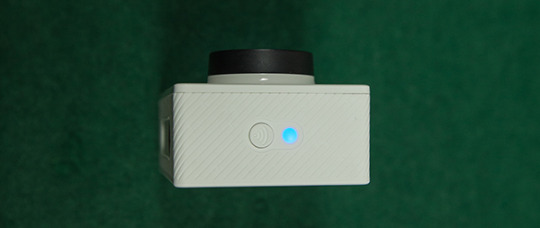
On the side of the camera, there is the button and LED light for wifi connection:
This LED is bright and easy to see. I wish the status LEDs would be as bright as this one.
Now here’s a little hint how to use it: Power up the camera and wait for at least 10 sec. until the camera is powered up. Then press the wifi button and wait again for 10 sec. and the light will start flashing. Now your phone is ready to pick up the camera’s wifi. The standard password is: 1234567890.
The camera has also built in bluetooth but it is not used to communicate with the app. A remote (pic is in the manual) will be released at some time.
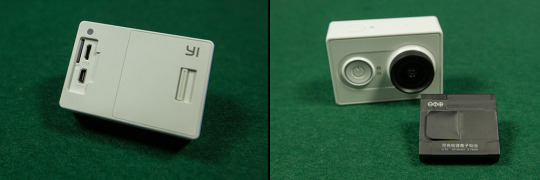
Let’s take a look at the backside of the camera. There you’ll find a 1010mAh battery, the microSD card slot, USB & HDMI ports.
MicroSD cards up to 64GB are supported, class 10 is recommended.
A/V output via USB is possible with firmware version 1.0.7 or later.
Video output via HDMI is available.
At the top of the camera there is the trigger button for photo and video recording. The mentioned status LED and a hole for the microphone.
On the bottom you will a 1/4″ thread, a status LED and a hole for the speaker.
I really like the thread at the bottom, because you can mount the camera without any additional case or housing. Although it is a bit shallow and you might need a washer. I think the notch next to the thread is used for a special 1/4″ to GoPro adapter, to give it more stability. The aluminium frame comes with this kind of adapter.
A USB cable is included in the basic set, that’s it. The traveler set contains a monopod – some kind of selfie stick. The underwater case is an optional extra, in contrast to the SJcam or GoPro.
So let’s move on to the functions of the camera. I’ll explain them and give examples according to the app:
Functions
When connecting camera and phone you’ll see this menu. If you have problems connecting the camera, check out my other posts about the Xiaomi Yi: e.g. Firmware Update.
You will see both apps and screenshots:
Android on the left // iOS on the right
Infos & Features according to:
Android v1.8
iOS v1.7.1
Firmware 1.2.0
If there are new versions, I’ll update this blog.
So check back and bookmark this site!
Photo Mode
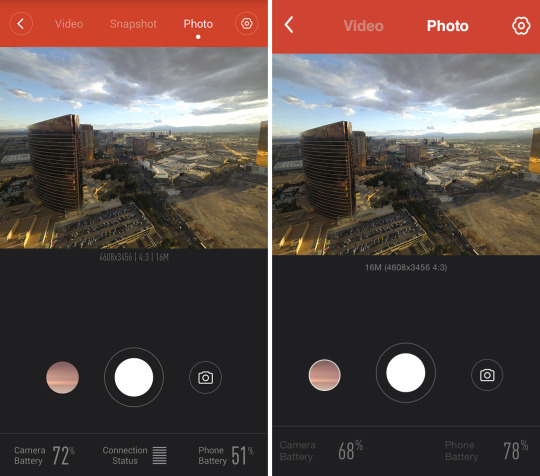
This is the screen when you are connected and in photo mode. On top you can select between video mode, photo mode and settings.
In Android you will also find “Snapshot” – more on that later.
You have a live preview from the camera and see the current settings below the image. On the bottom you can see the current camera & phone battery status. There is a trigger button and left of it you can go to the photo album.
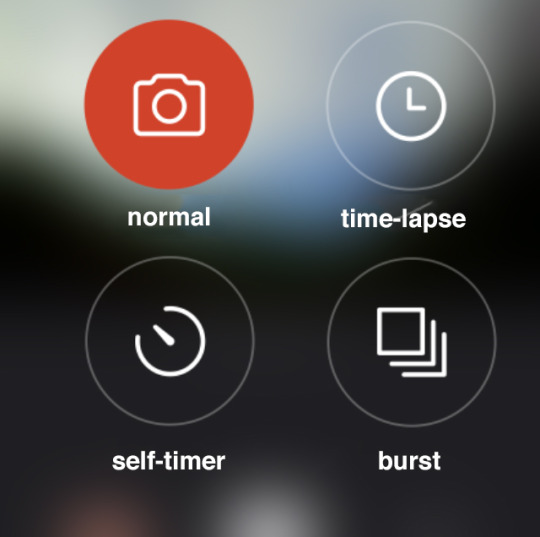
The photo mode button righthand of the trigger get’s you to the selection: normal, time-lapse, self-timer & burst mode.
In Android you’ll also have the connectivity displayed.
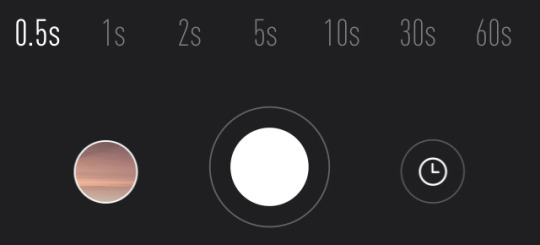
When selecting time-lapse you can choose from several timing options from 1 picture every 0,5 sec. up to 1 photo every 60s. The icon of the photo mode righthand of the trigger will change to the selected mode.
Several photos will be taken, but not combined to a video. This is available in video mode!
In self-timer mode you can select 3, 5, 10 or 15 sec. before taking a picture. With firmware 1.0.12. the power LED button is flashing until the camera takes a picture.
In burst mode you can select 3, 5 or 7 pictures per second and 7 pictures within 2 seconds.
Video Mode
The start screen in video mode looks similar to the one in photo mode.
With firmware 1.2.0 there is a new function for the button right of the record button.
You can select video time-lapse where a video of your time-lapse is generated. When selecting time-lapse in photo mode, several photos will be taken according to the selected interval, but no video is generated!
This option is currently not available in iOS App 1.7.1 !
Settings
When you enter the settings in the top menu of your app you’ll have a variety of options. I’ll go through them per sections. The naming is often a little different. If there are different features, I’ll point them out.
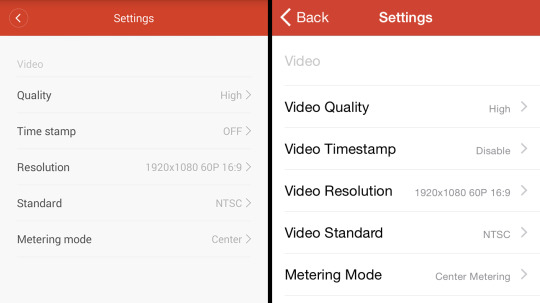
Video section
The first section in your app handles settings for video recording showing the following options:
Video Quality:
You can select high, medium or low and the camera changes the bit rate (1080p 60fps):
high: 25 MB/s
medium: 13 MB/s
low: 11,5 MB/s
Timestamp:
You can select if you want date, time or date & time recorded with your video.
Currently the Timestamp is not displayed when “lens rectification” is turned on. In early firmware versions the stamp was distorted in that mode.
Lens Rectification off & Timestamp off – LR off & T on – LR on & T on
Video Resolution:
The following options are available. What’s interesting, that 720p 30fps is not available.
2304×1296 30fps 16:9 (2K) – new with firmware 1.2.0
1920×1080 60fps 16:9
1920×1080 30fps 16:9
1920×1080 48fps 16:9
1920×1080 24fps 16:9
1280×960 60fps 4:3
1280×960 48fps 4:3
1280×720 60fps 16:9
1280×720 48fps 16:9
1280×720 120fps 16:9
Video Standard:
You can select the video standard PAL or NTSC. When selected NTSC the frame rates above are shown. When selecting PAL you’ll get 25 fps or a multiple thereof as well as the 24 fps options.
Metering Mode:
The metering mode refers to the way in which the camera determines the exposure.You can select center, average or spot which best suits the lighting conditions you are recording in.
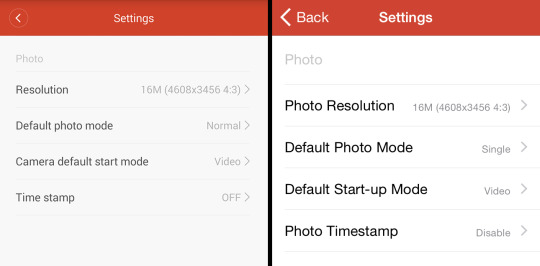
Photo Section
In the next section you can control the photo options of your camera:
Resolution:
The following resolutions are available on your camera. All of them are in a 4:3 format; 16:9 formats available with firmware 1.2.0:
16M (4608×3456 4:3)
12M (4608×2592 16:9) – new with firmware 1.2.0
13M (4128×3096 4:3)
8M (3264×2448 4:3)
5M (2560×1920 4:3)
Default photo mode:
You can choose from 4 photo modes: normal, self-timer, burst & time lapse. Here you can select in which mode the camera should start, when selecting the photo mode.
Default boot mode:
Here you can select if your camera should start in video or in photo mode when powering up.
Timestamp:
You can select separately if you want a timestamp in photos and/or videos.
Same as for video timestamp you can select date, time and date & time. Also there is currently no timestamp when “lens rectification” is turned on.
Lens Rectification off & Timestamp off – LR off & T on – LR on & T on
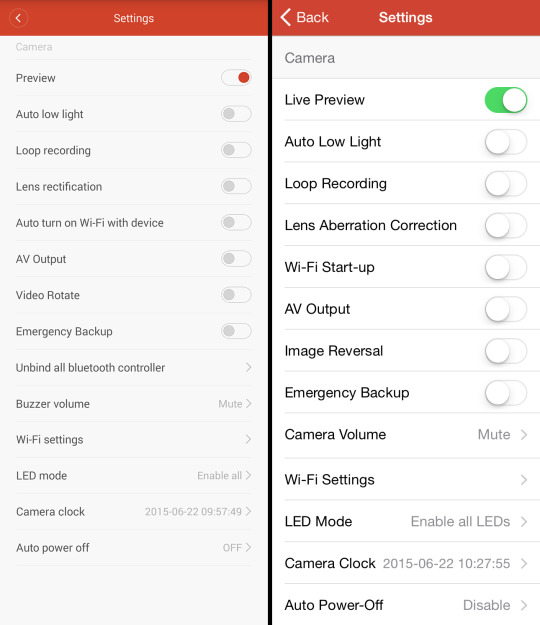
Camera Section
The next section handles general camera settings:
Preview:
This option switches off the preview on your phone.
Auto Low Light:
When you select this option, the camera will adjust the frame rate according to the current light conditions.
I still have to do some test in photo and video mode to get more info and share the result. What I can say until now:
In photo mode there seems to be a longer exposure and the picture gets brighter, but not much reducing noise.
In video mode the picture seems way darker than in photo mode, still testing on motion blur as frame rate will auto. go down.
Loop recording:
In loop recording the camera is saving 5 min. clips and will start overwriting the oldest files. This option is useful for surveillance e.g. when you use it as dashboard camera.
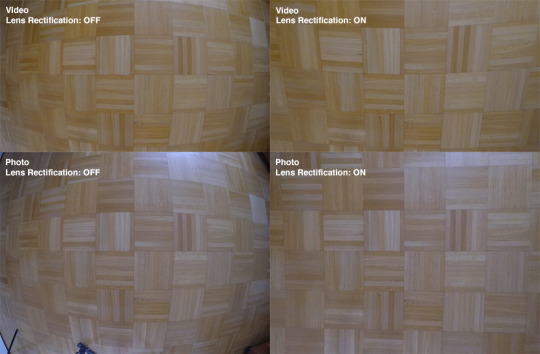
Lens rectification:
(Lens Aberration Correction)
The camera has a wide-angle lens therefore the image has a strong visual distortion. You can reduce this effect when selecting lens rectification. The quality of the picture will be a little poorer as the picture is stretched. The image size will stay the same (4608 × 3456) when in highest resolution mode.
These 2 photos and 2 video frames ware taken from the same position about 1,5m above the floor. I think in photo mode it does a pretty good job as the lines are almost straight.
It seems that in video mode the lines on top and bottom are straighter but with an additional distortion in the middle. The image I posted in the timestamp section looks better than this one.
I don’t know exactly how this is done technically. GoPro has a superview mode where the camera uses the full 4:3 sensor (xiaomi also has a 4:3 sensor) and stretches the edge to a 16:9 video picture.
I hope I can get more info on that soon.
Auto turn on WiFi with device:
Not much to explain here: Wifi is turned on when you power up the camera.
A/V Output:
This option came with firmware 1.0.7. With a special USB cable you’ll get an output signal via USB. This is important when you want to use the camera for FPV. Via USB there is also no delay in video transfer like during the preview on your phone via WiFi.
Image reversal:
You can flip the image 180° in case you mount your camera upside-down.
(Implemented in Firmware 1.0.9)
Emergency Backup:
I still have to test this option. More on that soon!
Unbind all bluetooth controller:
Here you can dismiss bluetooth controller. This option can be found in iOS App in the device section!
Buzzer Volume:
You can select how loud the camera should beep when pushing the buttons: high, low or mute.
WiFi Settings:
Here you can change the name of the camera’s wifi.
As well as the wifi password. (The standard password is 1234567890)
LED mode:
You can select enable all, disable all, status lights only.
The option “status lights only” can be very useful when the bright power indicator light is reflecting in your shot. The status lights refer to the 3 red LEDs at the top, bottom and backside; the wifi led is also turned off with this option selected.
Camera Clock:
Here you can select date and time – important when you use the timestamp!
Auto Power Off:
You can select 3, 5 or 10 minutes after which the camera should power down when not in use or select off.
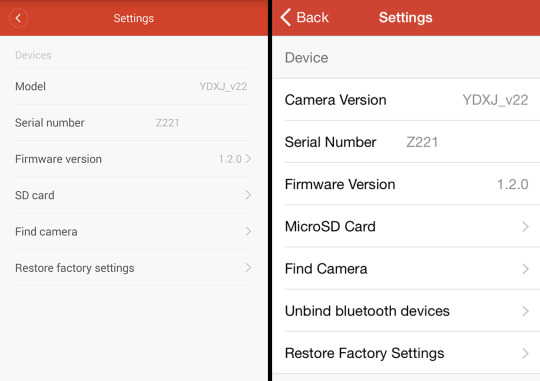
Device Section
Last section of your app handles the device settings:
The model number is shown as well as your camera’s serial number.
The serial numer indicates the hardware version.
It’s the first 3 digits without the Z:
Z221xxxxxxxxxxx = Revision 22
Z22Lxxxxxxxxxxx = Revision 22L
Z231xxxxxxxxxxx = Revision 23
Z23Lxxxxxxxxxxx = Revision 23L
Z23Axxxxxxxxxxx = Revision 23A
Z23Sxxxxxxxxxxx = Revision 23S
Each hardware version has a different firmware. (That’s why you enter it before downloading on the website.
The current firmware version is shown, you will be informed about available updates which can be performed via phone or manually. I wrote about how to do it manually here.
When selecting SD card you’ll see how much storage is left on your microSD card.
A nice option is “find camera”. When you select it the camera will start beeping. Well of course the camera has to be turned on (check auto power off). And it seems that it doesn’t matter which buzzer sound you have selected.
Unbind bluetooth devices – This setting is new with firmware 1.2.0 as the BT remote will be available soon to unbind connected devices. In Android App this setting is in camera section!
Lastly you have the option to restore your camera to factory settings.
Demo Footage
This is a clip I shot after the 2K resolution was added to the camera’s options.
Xiaomi’s 2K resolution is a little smaller than YouTube’s 2K resolution, that’s why you see black borders:
Here’s a comparison with the new EKEN H9 4K action camera. The EKEN is cheaper than the Xiaomi Yi and comes with lot’s of accessories including underwater case. It is labelled 4K but can only shoot 10fps at this resolution, in 1080p it can shoot up to 60fps, same as Xiaomi Yi.
Some problems are discussed on several Facebook- & websites:
Lens / Sharpness
There are some reported issues with sharpness and also some reports on how to fix it. It seems that the lens is not in the right position and can be repositioned by turning it. You have to loose the glue, turn the lens and fix it again. I’m not sure about my camera. The revision could be an indicator, I’ll investigate on that.
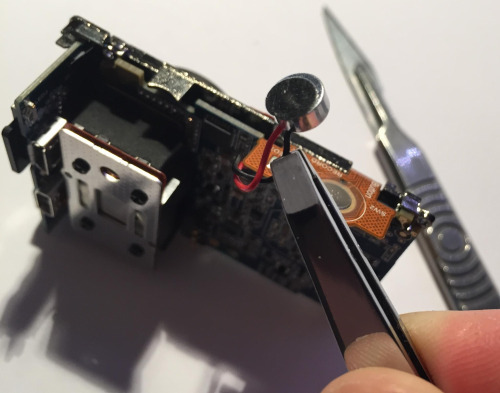
Bad Microphone / Sound quality
There is some kind of plastic put over the microphone to protect it, but it also shields the sound making it dull and quiet. You can fix the problem when opening the camera and replacing this plastic with a piece of foam (found on headphones). Here’s an instruction how you can take care of it.
WiFi sound interference
There are some sound interferences while recording when the wifi is activated. You can also improve the problem when placing adhesive over the antenna found on the cameras frontside (when opened). Here’s an instruction how you can take care of it.
Conclusion
On the one hand there are some problems with the camera, but fixes were found. It is the first camera from the manufacturer and we got the first production batch, so these things can happen.
There are also some minor issues in design which could be more perfect (thread, status lights,…) but as well, there might be reasons why it was done this way and I never got a camera which was totally perfect for me.
The lack of a LCD screen might be very important for some users. I don’t have a problem with that. It saves battery which runs out fast on every action camera.
On the other hand you get a really well built product, with great image quality for a stunning low price. My conclusion: It is not the same level as the GoPro Hero black 3 & 4 as well as the Hero 4 silver. But the cheapest of them is 5 times more expensive than the Xiaomi Yi, but it is not 5 times better.
If you want the best quality (4K resolution & 120 fps at 1080p) – you have almost no other option than the Hero 4 black.
If it must not be the best product, but the best product/performance ratio – go for the Xiaomi Yi.
Auch online - wenn nur in englisch - ist die Interlinear Bibel vorhanden: Interlinear Bibel : Griechisch, Hebräisch mit Strong Verweise Altes Testament Interlinear online Neues Testament Interlinear online Nicht Interlinear, aber mit Wort für Wort Erklärung auf Deutsch Bibel, Übersetzung, Ursprachen
Diese Anleitung beschreibt, wie Sie McAfee restfrei deinstallieren. Bitte nicht erschrecken, sie ist deshalb so lang, um möglichst viele Fehlerquellen von vorn herein auszuschliessen. Sieht komplizierter aus als es ist, gehen Sie einfach Schritt für Schritt vor und führen Sie NUR die Anweisungen aus, die für Ihr Betriebssystem ausgewiesen sind ODER keine extra Betriebssystem-Angabe aufweisen. Achten Sie bitte auch darauf, dass Sie während der De- und Neuinstallation zeitweise nicht geschützt sind. Sie müssen daher Ihr Emailprogramm schliessen und es vermeiden, während dieses Vorgangs andere Internetseiten als die McAfee-Webseite aufzurufen. 1. Laden Sie das MCPR/MCPR-2 Tool herunter (speichern auf dem Desktop): VISTA/XP/2000: https://us.mcafee.com/root/MCPR2.exe Win98/WinME: http://download.mcafee.com/products/licensed/cust_support_patches/MCPR.exe 2. Deinstallation VISTA: Start - Systemsteuerung - Programme entfernen XP/2000/Win98/WinME: Start - Systemsteuerung - Software -> Entfer


Kommentare